Verifying & Managing Your Action Network Reply-To Email Addresses
Action Network requires you to verify your reply-to email to prevent spam, abusive, or malicious sending. The reply-to email is the address activists use to respond after receiving your message. Until you verify it, you cannot send emails using that reply-to address. In this guide we'll go through the process for verifying an email address, managing your default email address, and removing previously verified addresses. You can verify email addresses in two areas of Action Network, when sending an email or from the group Settings menu. In this guide we'll focus on managing reply-to verification through the group Settings menu.

Important: Only use Green Party-issued email addresses (e.g. ending in @localparty.greenparty.org.uk) as your reply-to address in Action Network. Using personal or non-GPEW emails can lead to deliverability issues, spam filtering, and even data protection breaches. If your local party manages its own email domain then you can also verify these email addresses, but you'll need to perform additional verification to avoid deliverability issues. You can find out more here.
How To Verify A Reply-To Email Address

You'll need to have the Settings Permission to verify and set default reply-to addresses. If you're unable to see the options below you should speak to your local party chair who should have the required permissions.
1. From your Action Network Group page, click on Settings.
2. From the new navigation menu that appears click on Email Settings.
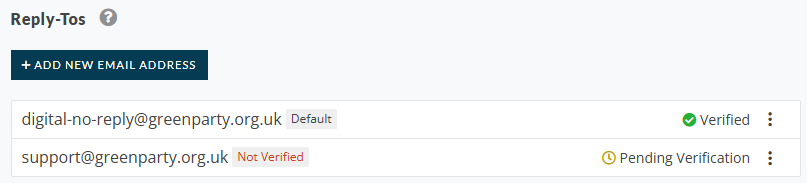
3. Click on the button marked + ADD NEW EMAIL ADDRESS.
5. You'll shortly receive an email to the address that you've added. That email will include a link that you will need to click on to verify your email.
6. Once you have clicked the link you should be taken to a screen showing that the email address has been verified.

If you receive an error message, instead of a confirmation that the email has been verified you can go back to the Email Settings page to check if the address has been successfully verified.
How To Set A Default Reply-To Address In Action Network
1. Navigate back to the Email Settings menu (steps 1-2 in the above guide), where you will see a list of any email addresses that are verified, or pending verification.
2. Click the three dots next to Verified for the email address you want to set as your default reply-to address and select Set As Default.
How To Remove A Previously Verified Reply To Address
1. Navigate back to the Email Settings menu (steps 1-2 in the first guide above), where you will see a list of any email addresses that are verified, or pending verification.
2. Click the three dots next to Verified for the email address you want to set as your default reply-to address and select Delete.
If the Delete option is greyed out, and you can't click on it you are attempting to delete your default reply-to address. You'll need to set a new default reply-to address before you can delete it.

Did you find this article helpful? We’re always working to make our guides better, and your feedback is invaluable! If you have any suggestions or found something unclear, please use the thumbs down button below to provide feedback on the article.
Your feedback helps us keep the content relevant and useful for everyone.
Related Articles
Action Network Features We Don't Use (And Why)
Action Network includes a wide range of campaign tools, but not all of them are the right fit for how we work as a UK political party. Some features have been switched off entirely, while others are available but discouraged due to practical, ...Requesting Access To The Action Network Files Feature
You may have notices that the Files feature for your Action Network group isn't available. By default this feature is turned off when a group is created. This guide explains who can request access, how to apply, and what happens after you submit your ...Using & Customising GPEW-Issued Email Layouts
To support Action Network groups in maintaining a consistent brand, the Green Party Digital Support team will occasionally release email layouts which can be customised depending on your needs. Email layouts use the same drag and drip editor as you ...Action Network Email Tips
You're probably quite comfortable sending and checking emails in a personal, or professional capacity– but sending mass emails using a digital campaigning tool is a different kettle of fish entirely, and so here are some tips on sending mass emails ...Using Personalisation Datasets To Personalise Emails
What Are Personalisation Datasets? The Personalisation Datasets feature was released by Action Network on September 16th 2021. This feature allows you to create custom clips, which return a value based on the value of a Custom Field. How Can ...